OWNER'S INSTRUCTIONS V21, V22, V25
| Index |
If your mast or any part of your boat or rigging comes in contact with a power line, you could be killed or injured. Don't sail your boat into a power line. Don't step your mast into a power line, or don't move your boat, on its trailer, into a power line. Masts, wires shrouds, or wet fiberglass are good conductors and can carry current directly to you. Look up and make sure you have clearance before doing anything with your boat.
If you are caught in a electrical storm, don't touch anything that is metal, including the mast, shrouds, boom, lifelines, rudder, tiller or metal hardware. If possible, don't touch anything that is wet. Many experts recommend that a heavy gauge copper wire be securely fastened to one of the shrouds and allowed to hang in the water to carry off the electricity from a lightening strike.
CAUTION: Our boats have 12 volt batteries. Batteries produce explosive gases, corrosive acid and levels of electrical current high enough to cause burns. To lessen the chance of personal injury or property damage, the instructions below must be followed exactly.
We tie the keel to the trailer before the boat leaves the plant. Make sure this line is removed. Using the winch, lift the keel clear of the trailer. Remove lights and license plate. Attach a line to the bow of the boat. Back the trailer into the water until the boat floats free.
Before pulling the boat out of the water, winch the bow securely to the trailer to prevent the boat from sliding backward off the trailer.
With the boat in the water, lower the keel by gripping the handle firmly and rotating it counter-clockwise. The winch handle works through a friction clutch, and shout stay in place wherever you leave it. Release your hand from it very carefully, making sure it will stay where it is. If the winch slips, it is probably because of oil, wax or other contamination on the clutch face. To correct the problem, lower the keel to the full down position, and unscrew the winch handle by turning it counter clockwise. This will expose the composition clutch face. Lightly sand the clutch face and the bearing surface on the handle with 220 grit sandpaper to remove all contamination, then reassemble.
Never mess around with the winch innards with load on the cable. Never get your face near enough to the handle that it can strike you. There can be a lot of weight on the winch and a spinning handle can be very dangerous. Lower the keel until the hole in the top of the keel lines up with the lock hole in the keel trunk. Insert the 3/8 x 3 1/2" lock bolt through the keel trunk and the keel, with a rubber washer on each side of the keel trunk. Secure the nut finger tight. Never stick your finger in the lock hole to search for the keel. Something could slip and might get bitten. Make sure the lock bolt passes through the keel. See the following diagram for a guide as to where everything is.

To raise the keel, crank the handle until the keel just touches the hull. When resistance is felt, stop cranking.
When the boat is launched for the first time, check for leakage around the lower pivot bolt. The nut should be tightened securely enough to stop all leakage, but not so tight as to damage the rubber.
The boat is self-righting only with the keel locked down. The lock bolt will assure that the keel angle is proper, and that the keel stays down in the event of a severe knockdown.
To eliminate vibration and hum from the keel cable, allow a few inches of slack in the cable after the keel is locked down.
Install the upper shrouds, forestay and jib halyard to the uppermost 3/8" hole in the mast.
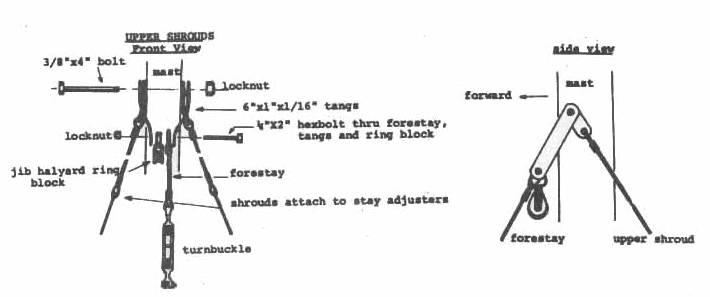
On the 21 and 22 the backstay bent tang slips over the 3/8" bolt protruding from the rear of the masthead and is held firmly in place with a 3/8" locknut. On the 25, the backstay wire loop bolts (with a 1/4" x 1 1/2" bolt and locknut) between the rear holes in the masthead fitting. Make sure the nut is fully engaged in the threads.
The main halyard passes through the cheek pulley at the masthead and the forward end ties off to the cleat on the starboard side of the mast. Tie a twist pin shackle (with a short bowline) to the aft end of the halyard (the end nearest the sail feed track).
The jib halyard passes through the pulley near the top of the forestay and ties off to the cleat on the port side of the mast. Tie a twist pin shackle (with a bowline) to the forward end of the halyard.
The spinnaker halyard passes through a second ring pulley that hangs directly beside the jib halyard pulley, It ties off to a second cleat on the port side of the mast. Tie a twist pin shackle to the forward end of the halyard.
Lay the mast on top of the boat with the base near the mast step on the cabin top, and with the other end of the mast in the aft mast carrier.
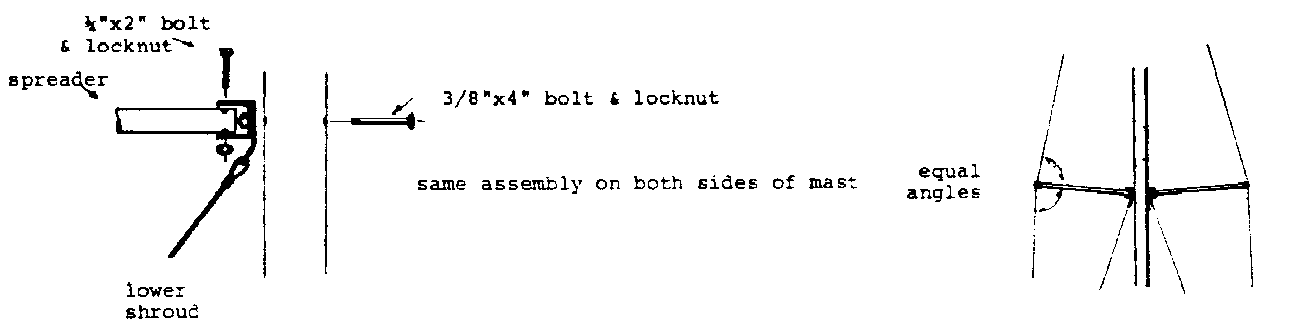
Attach the stay adjuster slides (fastened to the upper and lower shrouds) to the stay adjuster bodies. Use 1/4" clevis pin and cotter ring. Put the clevis pin through the second hole down on the body and through the end hole on the slide. Connect the stay adjuster bodies to the chainplates with 1/4" clevis pins and cotter rings. (The upper shroud stay adjuster goes in the rear hole of the chainplate.)
Connect the backstay to the U bolt on the rear cockpit coaming in exactly the same manner as the shrouds.
Attach the mast to the slot in the hinged step with the 3/8" bolt and nut.
Make sure that the shrouds are not entangled on the boat or trailer, and then raise the mast. The task is made much easier if a second person stands on the foredeck and pulls on the forestay as the mast goes up. Connect the forestay turnbuckle to the forward hole in the foredeck fitting. Be careful not to hit a power line with the mast of rigging. You could be injured or killed.
Do not release forward pressure on the mast until the forestay is connected.
Set the mast at right angles to the waterline. When properly tuned, the shrouds, backstay and forestay should be snug, but not excessively tight. Use the following sequence to set the rigging.
Another method of adjusting the shrouds is as follows: with all the rigging in place, grip the upper shroud about 4 feet above the deck and pull inward (toward the center of the boat). The lower shroud will go slack and allow another hole to be taken up in the stay adjuster. To loosen the upper shroud, pull inboard on the lower shroud. This method, of course, takes 2 people, and can get the rigging far tighter than is desirable.
The mast is lowered by reversing the above process. (Loosen the forestay turnbuckle, but leave all the other shrouds and the backstay connected.)
The finished assembly is shown below
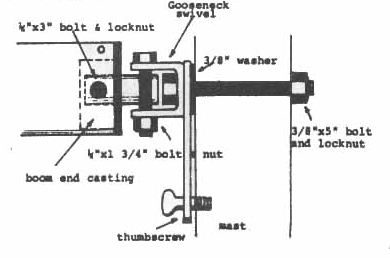
Attach the double block to the boom end tang with the small shackle. Run the mainsheet through the swivel cam cleat block, through the forward pulley in the double block on the boom, through the pulley on the starboard rail, back through the aft pulley on the boom, and tie the end to the deck eye just aft of the swivel cam cleat.
First slide the foot of the sail into the boom. Pass a 1 1/2" pin through the boom and through the small ring in the forward lower corner of the sail. (the tack). Tie off the aft end of the sail to the eye at the end of the boom.
Connect the halyard shackle to the head of the sail, and feed the bolt rope on the leading edge of the sail into the spread portion of the mast.
For light winds, the sail should be full and somewhat baggy along the boom. As the wind increases the sail can be flattened for better efficiency by tightening the halyard and outhaul. A common error is not having the halyard tight enough, However, don't get it so tight that the sail has long vertical wrinkles along the mast.
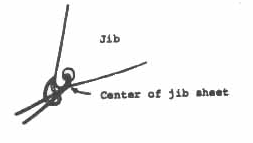
Attach the forward corner of the jib to the rear hole in the foredeck fitting, clip the jib to the forestay, and tie the jib sheet as shown. When the jib is raised, get the halyard really tight. When sailing there should be no scallops or sagging between the clips on the forestay. A loose leading edge is the most common error and generally harmful to the boat's windward performance
When the keel pivot bolt is re-installed, make sure that it passes though the hole in the keel.