Page 1 of 5
Effective 9/16/70
INSTRUCTIONS FOR VENTURES
Preparations for trailering:
Stow the boom, rudder, tiller and all loose gear on the bunk cushions in the cabin, Leave enough separation to avoid chafing. Place the base of the mast in the cabin at the forward end of the front bunks. Be sure to pad the mast to protect the cushions, hull and transom. Flag the end of the mast with a red cloth, 18" square. (At night a light on the mast is required under some state laws.)
Tie one end of the main sheet to the left end of the trailer side rail. Pass the line over the boat and take 2 wraps around the mast and tie the line tightly to the other trailer rail. Be sure that the mast is positioned far enough to one side so that it does not chafe against the mast support post. Tie the end of the trailer winch rope to the bow eye with a bowline knot and winch the bow snugly into the rubber bow support. If you have a mast carrier, bolt the mast to the crutch tightly to avoid vibration damage to the mast. Tie a line around the middle of the mast and secure to the jib cleats. The keel should be lowered onto the rubber V block to relieve unnecessary strain on the hull. Carefully store or secure all lines, halyards and shrouds to avoid entanglement in the trailer wheels while towing. Check light connections and attach the safety chains to the car.
Ramp Launching:
Using the retracting winch, lift the keel clear of the rubber V block. Remove lights and license plate. Attach a line to the bow of the boat. Back the trailer into the water until the boat floats free.
For extremely shallow ramps, back the trailer until the wheels are near the water. Place chocks behind both wheels. Tie a length of 3/6" line to the skid plate at the nose of the trailer. Allow 12-15 feet of slack and tie the line to the car. Disconnect the trailer from the car and drive forward until the line is tight. Remove the chocks and allow the trailer to back into the water until the boat floats free. Reverse the process to retrieve the boat. Make sure the boat sits squarely on the trailer before hauling.
Before hauling the boat out of the water, winch the bow securely to the trailer to prevent the boat from sliding backwards off the trailer.
Raising and lowering the keel:
The Ventures are equipped with two types of keel retraction winches. One is a friction type brake winch and may be equipped with a spring loaded ratchet. To lower the keel, simply turn the handle counter-clockwise. The other type has a two position locking ratchet that must be released in order to turn the handle, and care must br exercised in its use. With the boat in the water, lower the keel by gripping the handle firmly , releasing the ratchet, and turning the handle until the lock hole in the keel lines up with the locking hole in the trunk, DO NOT LOWER THE KEEL BELOW THIS POSITION. Never let go of the handle without re securing the ratchet. Insert the top lock bolt, with a rubber washer on each side of the trunk and tighten the nut finger tight.
When the boat is launched for the first time, check for leakage around the lower pivot bolt. The nut should be tightened securely enough to stop all leakage but not so tight as to damage the rubber or fiber washers. Check for leakage around the drain tube bolt and hose clamps.
The boat is self righting only with the keel locked down. The lock bolt will assure that the keel angle is proper, and that the keel stays down in the event of a severe knockdown.
To eliminate vibration from the keel cable, allow a few inches of slack in the cable after the keel is locked down.
If you are sailing in shallow water, where you can reasonably expect to hit bottom, install the lock in the top hole before lowering the keel. Then lower the keel until it comes to rest against the bolt. Since the lock bolt now does not pass through the keel, it will wing back if you hit bottom. However, if a severe knockdown is taken, bear in mind that the keel may swing back up against the hull. Caution should be exercised while sailing with the keel positioned in this manner.
To raise the keel, crank the handle until the keel just touches the hull. When resistance is felt, stop cranking.
Rigging the standard boat:
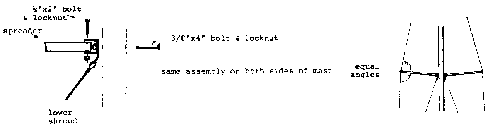
(tighten shroud bolts firmly but not tight enough to deform the mast)
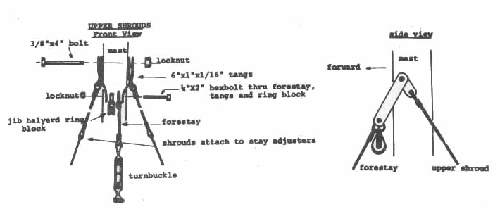
Shrouds, forestay and jib halyard block V17, V21.
Page 2 of 5
Upper and lower shrouds, halyard block, and backstay V-24, V-22
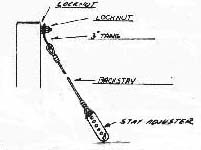
 Attach a stay adjuster to the lower end of the backstay. The tang end of the backstay fastens to the aft bolt in the masthead.
Downhaul
The downhaul )6' poly line) passes through the 3/8" hole in the base of the mast. Tie a knot in the line, on the inside of the mast, to keep the downhaul from pulling loose.
Main halyard
The main halyard passes through the cheek block at the mast head and ties off to the cleat on the starboard side of the mast. Tie a twist pin shackle (with a bowline) to aft end of the halyard.
Jib halyard
The jib halyard passes through the block near the top of the forestay and ties off to the cleat on the port side of the mast. Tie a twist pin shackle (with a bowline) to the aft end of the halyard.
Masthead rigging V-21
Upper shrouds and masthead stay attach to the mast in the same manner as the standard shrouds, except that the attachment bolt passes through the 2/8" hole 1"down from the masthead. Use 1/4" turnbuckles on masthead stay and upper shrouds.
Backstay V-21
 Genoa halyard V-21
The genoa halyard passes through the block near the top of the masthead stay. and ties off to the upper cleat on the port side of the mast. Attach a twist pin shackle to the forward end of the halyard.
Genoa halyard;, V-17, V-22, V-24
Use the same halyard as the standard jib.
Spinnaker halyard, V-21
The spinnaker halyard passes through a second block hung beside the genoa halyard block.
Page 3 of 5
Stepping the mast:
Lay the mast on top of the boat with the mast base forward.
Attach the turnbuckles to the chainplates.
Attach the mast to the slot in the hinged step with the 3/8" bolt and nut (if the boat does not have a hinge, it will be necessary for one of the crew to hold the base of the mast as it is raised.).
Make sure that the shrouds are mot entangled on the boat or trailer. and then raise the mast. The task is made easier if a second person stand on the foredeck and pulls on the forestay as the mast goes up. Connect the stay adjuster to the eye on the foredeck.
Do not release forward pressure on the mast until the forestay is connected to the foredeck eye.
Adjust the turnbuckles and forestay to set the mast at right angles to the waterline. Important: Install the cotterpins on turnbuckles to assure that the turnbuckles do not rotate loose. Rigging should be set reasonably tight. Make sure all cotter pins are folded over. The mast is lowered by reversing the above process.
Mainsheet, V-17
Attach the swivel block to the boom end tang with the small shackle. Run the mainsheet through the swivel cam cleat eye, through the block on the boom, and tie the end to the deck eye on the opposite side of the boat.
Mainsheet, V-21, V-22, V-24
Attach the double block to the boom end tang with the small shackle. Run the mainsheet through the swivel cam cleat eye, through the forward pulley in the double block on the boom, through the pulley on the starboard rail, back through the aft pulley in the double block on the boom, and tie the end to the deck eye just aft of the swivel cam cleat.
Mainsail:
When raising the mainsail, pull the sail up until the head of the sail is as close to the top as possible. then pull down on the boom with the downhaul line just tight enough to remove all slack from the leading edge of the sail. The Cunningham hole (a brass thimble about 9" above the boom) may be used to adjust the sail for different wind conditions. For light winds, and for sailing downwind, the sail is made with a fullness in the middle of the sail and along the boom. For strong winds, pass a line through the Cunningham hole and around the boom an pull tight to stretch the leading edge of the sail. Pull the boom outhaul line tight to stretch the base of the sail. This serves to flatten the fullness of the sail for better performance in strong winds.
Jib sheets:
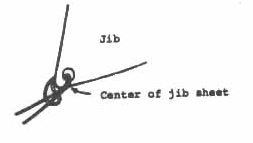 Jib sheets lead inside of the shrouds, and through the nylon fairleads on the cabin top.
Jib tack
A twist pin shackle fastens the jib tack to the eye at the bottom of the forestay.
Roller furling:
The standard goose neck fitting will serve as a simple roller reefing system, To reef the main, remove the retaining pin (A) from the goose neck slide and lift out the pivot pin (B). Roll the mainsail on the boom and reinstall the pivot pin and retaining pin. When tolling the main, make sure that the sail rolls tightly on the boom at the forward end of the boom. Remove the lower batten to avoid breaking it as the sail is rolled on the boom. It is also possible to reef by removing the goose neck slide from the mast. rolling the sail, and re-inserting the slide in the mast slot.
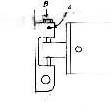 Rudder lock:
Make sure that the rudder lock cotter pin is in position to hold the rudder in place when sailing.
Page 4 0f 5
Rigging the mast for options:
Mast hoist and boom options:
use the same block and line setup for the boom vang or for the mast hoist. To raise the mast, attach as shown on drawing and attach forestay turnbuckle to forestay plate (stay adjuster to bow eye on V-17, V-21). Attach the lower shrouds to the chainplates. Lift the mast and pull hoisting line. Remove twist pin shackle from the forestay and attach a turnbuckle. Reverse procedure to lower the mast. Having one person standing on cabin top helping to steady mast, while a second person pulls on mast hoist line makes the job very easy.
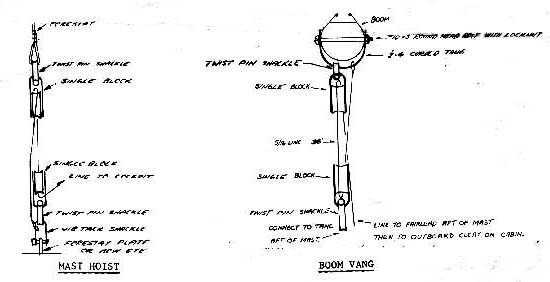 Image
Image
Spinnaker Sheets:
Spinnaker sheets lead aft to the eyes near the stern of the boat, and then forward to the cleats.
Foreguy:
Tie a twist pin shackle to the foreguy. The shackle connects to the forward end of the spinnaker pole. The foreguy leads downward thrum the eye on the deck (36" aft of the bow), back through the eye at the forward starboard corner of the cabin top, to the cleat starboard of the jib sheet cleat.
Topping lift:
Tie a twist pin shackle to the topping lift. The shackle connects to the strap on the pole. The topping lift leads upward to the eye on the mast 10' above the deck. down to the eye on the forward port corner of the cabin top, and back to the cleat to port of the jib sheet cleat.
Self tending jib boom, V-22, V-24:
Install the boom and hardware as shown on the drawing. Attach 2" of poly line to the jib clew with a bowline and pass the line through the pad eye on the boom end and tie to the cleat. The jib sheet goes through the swivel block on the boom and through the nylon fairleads on the cabin top and then to the jib sheet cleats,
 Page 5 of 5
Self Righting:
The Ventures meet the following self-righting requirements:
With sails rigged to the mast and boom. the keel locked in the down position. and the masthead pulled to the level of the water, the boat, when released, will return to an upright position. With virtually any sailboat it is possible for the belly of the sails to trap enough water to hold the boat down on its side if the mainsheet, jib sheet, genoa sheet, or spinnaker sheets are secured. In the event of a knockdown, release all sheets to prevent this possibility. In relatively calm sea conditions, water will not enter the cabin hatch in the event of a knockdown. In rough seas, however, it is possible for waves to enter the cabin through open hatches if the boat is held on its side. While sailing in rough weather, it is advisable to keep the hatches closed.
With the normal gear and crew, the Ventures have sufficient foam floatation to keep the boat afloat in the event the cabin fills. When completely filled with water, the boat will be relatively unstable Do not remove the foam floatation blocks in the interior of your Venture under any circumstances.
Maintenance:
The fiberglass finish should be protected in the same manner as an automobile finish. An occasional polishing and waxing (with any good quality automotive polish and wax) will keep the surface in excellent condition.
The trailer should be hosed down completely after exposure to salt water.
Use a good grade of marine exterior resin oil on all wood surfaces. Repeated oiling and rubbing will help preserve its appearance.
If the boat is kept in the water, it is recommended that the keel pivot bolt be removed every 12 months (while the boat is on a trailer) and inspected for signs of wear or electrolysis. The holes in the keel should be given a similar inspection. To gain access to the pivot hole, remove the keel pin and lower the head of the keel until the hole is exposed. Keep the retraction cable snug to prevent the keel from falling sideways on the trailer. The rubber and fiber washers on the keel pin bolt should also be inspected every 12 months. Cover all washers with a liberal coat of a good quality bedding compound. Re-assembly of the keel pivot bolt should be as follows:
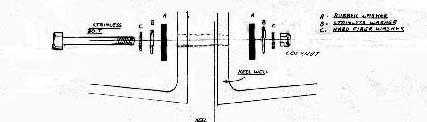 When the keel pivot bolt is re-assembled, make sure that it passes through the hole in the keel.
Periodically check the keel lift wire and the keel cable wear bolt for signs of wear. If wear becomes noticeable;, replace either the lift wire or the bolt as necessary. With the boat out of the water, remove the wear bolt and replace it with a new bolt. The washer and nut sequence is exactly the same as shown above for the keel pivot bolt. Tighten the nut sufficiently tight to prevent leakage, but not so tight as to damage the rubber washers. Make sure that the lift wire passes aft of the wear bolt.
It is good practice to periodically check all hardware fastenings to assure that they have not loosened.
BACK