TURNING:
Don't try to make really tight turns. Extreme turns, while going forward or backwards, may damage the actuator or other parts of the trailer.
TOWING WITH HYDRAULIC BRAKES:
When you back up, the brakes may apply and you will get some brake pressure. Damp brakes may tend to seize when backing. Back slowly and steadily. You may have trouble with brake actuation if you try to back up a steep hill or driveway.
Make sure that the trailer is towed in a level position. It should never be towed with the tongue lower than the rear of the frame, as this will cause the brakes to activate and stay on during normal towing.
9. RAISING THE MAST
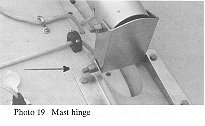
ATTACH THE MAST TO THE MAST HINGE:
Unbolt the mast from the forward rail, and untie it from the hinged mast step and the rear wood support. The 3/8" X 4 1/2" bolt and lock nut that holds the mast to the forward rail for trailering also serves as the pivot pin for the hinged mast step. With the rear of the mast supported by the wooden support in the cockpit, move the forward end on the mast back to the hinge area.
The top part of the hinge always remains bolted to the bottom of the mast. The bottom part of the hinge always remains bolted to the deck. The 3/8" x 4 1/2" bolt and locknut that secured the mast base to the forward rail is used as the hinge pin. Insert the hinge pin (see Photo 19) and make sure the lock nut is on tight enough that the plastic seal engages the threads. (You will need two 9/16" end wrenches for this.) It is not necessary to run the nut down tight on the hinge plates. Just make sure the nut is on tight enough so that you can't turn it with your lingers.
ADJUST LOWER SUPPORT WIRES:
After the mast hinge bolt is installed, adjust the lower mast support wires as shown in Photo 20. This will keep the mast from falling sideways as it is raised.

These wires are just long enough that you can move the bottom of the mast to the bow rail for trailering without having to disconnect them from the mast or the deck.
LIFTING THE MAST:
Make sure that the mast wires are not entangled on the boat or trailer, and then raise the mast. This is best accomplished by standing on the cabin top, aft of the mast, and lifting the mast into position. Be careful not to hit a power line with the mast or rigging. You could be injured or killed.
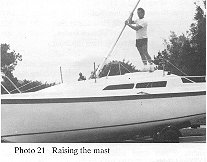
The mast lifting task is made much easier if a second person stands on the foredeck and pulls on the forestay as the mast goes up.
CONNECTING THE FORWARD MAST SUPPORT WIRE:
Connect the forward mast support wire turnbuckle to the forward hole in the foredeck fitting. Do not release forward pressure on the mast until the forestay is connected.
If you have to move the boat after the mast is up, be watchful that you don't run it into a powerline.
Be sure to connect the mast light wire to the deck socket.
10. RAISING THE MAST WITH THE OPTIONAL SYSTEM
GENERAL:
The following photo gives you an idea of how the optional mast raising system works.
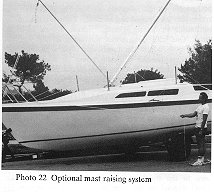
(1) A 3 part block and tackle that connects the forward wire stay to the nose of the boat. This allows the mast to be raised with only a few pounds of pull on the line.
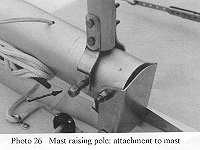
(2) An aluminum pole with a slot in one end and a Y shaped bracket on the other. This pole is used to put distance between the forward stay and the base of the mast. This keeps the load on the block and tackle to a minimum as the mast goes up and down.
All of the comments in the previous section still apply to raising the mast. The optional system simply reduces the physical effort involved in the mast lifting.
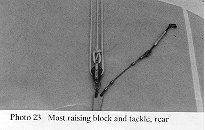
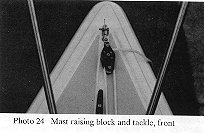
MAST RAISING BLOCK AND TACKLE:
Hook up the 3 part block and tackle between the forward wire stay and the nose of the boat. Using the small screw pin "U" shaped shackles, connect the blocks to the triangular stainless steel plate on the forward wire stay and to the rear hole in the stainless deck plate as shown in Photos 23 and 24. The pulleys are not identical. Make sure they are installed as shown. Make sure the small pins in the U shackles are screwed down TIGHT.
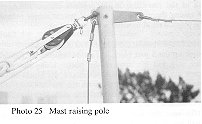
THE MAST RAISING POLE:
Look up to make sure that you are clear of all overhead power lines. Now insert the triangular plate on the forward wire stay into the notch on the end of the pole as shown in Photo 25. Insert the 1/4" x 2" bolt into the hole in the pole and the hole in the plate to keep,the plate from jumping out. Use a lock nut to hold the bolt.
Now look around to make sure all mast wires are clear and free of tangles. Again, make sure you are clear of all overhead power lines and that the mast won't hit them when it goes up or when you have to move the trailer after the mast is up. Raise the mast by pulling on the line. See Photo 22.
It goes up easy. If the boat is in the water, stand on the forward deck and pull on the line. If it is on its trailer, stand on the ground beside the nose of the boat and pull it up. The pulleys are on swivels, so you can pull from any direction. Don't stand under the mast, under the forward mast support wire, under the rope block and tackle, or beside the pole sticking up from the base of the mast. If the mast falls, these are not the places to be.
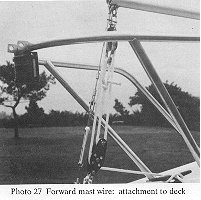
Pull the rope tight, and tie the end securely to the cleat on the forward deck. Now connect the bottom end of the turnbuckle to the forward hole in the stainless steel fitting at the nose of the boat as shown in Photo 27. Look up at the rig to make sure that none of the loops in the wire ends are kinked or hooked over the stainless steel fittings to which the wires attach.
When you sail, you can leave the block and tackle in place. Just coil the loose end of the line and drop it down the forward hatch. Some sailors take the loose end to the cockpit to a cleat and use the block and tackle to tension the rig for better sail shape when sailing into the wind.
Always connect the lower end of the forward mast support wire to the stainless fitting at the front of the boat. Don't depend on the rope and the cleat to support the mast while sailing. Rope is fine, but stainless steel is better. (If rope is left too long in the sun, it loses a lot of strength.)
LOWERING THE MAST:
To lower the mast, reverse the process. Again, watch for power lines. Before you lower it, put the wooden mast support in its holders in the cockpit. Otherwise the mast will come down on the cabin hatch and maybe mar the finish.
Remember, the load gets greater as the mast gets lower. Be prepared. Get a good grip on the line and don't be fooled by the very small loads while the mast is close to the up position.
You can steer the top of the mast into its wooden cockpit support by pushing or pulling sideways on the line between the pulleys.
Be sure to disconnect the mast light wire from the deck socket.
Once again, for trailering, it is not necessary to disconnect any of the rigging except the bottom end of the turnbuckle on the forward mast support wire. The 3 part mast raising block and tackle can even remain connected. Tie all wires and ropes securely so they can't drag on the ground, hook up on a passerby or get tangled in your trailer wheels. The wire rigging is strong, and if it hooks up on something, there will be a lot of pieces left behind.
We leave you with one repeat warning. People have been killed or badly injured as a result of masts or support wires coming into contact with overhead power lines. Be watchful whenever you rig, launch, trailer or do anything else with your boat that might involve contact with power lines. If there is a threatening power line anywhere near areas where you sail, call or write to the power company and try to get them to move it or bury it. Notify us and we will also lean on them. Don't remove the warning sticker on the mast. The repeated warnings may get boring, but power lines are life threatening risks.
11. ADJUSTING THE MAST SUPPORT WIRES
MAST RAKE:
The mast, when set properly, should lean about 3 degrees to the rear of the boat from vertical.
When properly tuned, all of the mast support wires should be quite snug. Use the following sequence to set the rigging.
REAR SUPPORT WIRE:
Adjust the rear mast support wire to give the mast the proper fore and aft position.
FORWARD SUPPORT WIRE:
Take up the slack in the forward mast support wire by adjusting the turnbuckle. At this point, tighten it enough to give a slight forward bend to the center of the mast.
TOP SIDE SUPPORT WIRE:
Adjust the top side mast support wires so that the mast is straight from side to side. Try to make them snug. Note: the wire adjuster channels are designed as "verniers" to provide adjustments in 1/8" increments. This is accomplished by having the holes in the wire straps spaced at different intervals than the holes in the adjuster channels. As the wire is extended every 1/8", a new set of holes will line up, allowing very precise tuning adjustments. A small screwdriver can be inserted in one of the sets of non-aligning holes to provide leverage to get tension on the wires while the clevis pin is being inserted in the proper holes. Use the 1/4" clevis pins and cotter rings to connect the channels to the straps fastened to the support wires. These channels are stronger than turnbuckles, better able to stand the bending loads resulting from raising and lowering the mast, and less likely to accidently come loose.
MIDDLE SIDE SUPPORT WIRE:
Adjust the middle side support wires as described above. Don't get them too tight or the center of the mast will be pulled toward the rear of the boat.
ALTERNATE METHOD OF TENSIONING WIRES: Another method of adjusting the mast support wires is as follows. With all the rigging in place, grip the upper wire about 4 feet above the deck and pull inboard (toward the center of the boat). The lower wire will go slack and allow another hole to be taken up in the adjuster channel. To adjust the upper wires, pull inboard on the lower wire. This method, of course, takes 2 people, and can get the rigging far tighter than is desirable.
FORWARD WIRE TURNBUCKLE:
Tighten and cotter pin the forward mast support wire turnbuckle to tension the entire rig.
MAST APPEARANCE AFTER PROPER TUNING:
In general, the mast should be reasonably straight when no sails are up. When sailing in heavy winds, the masthead should curve gently back and downwind. The downwind wires will be slack when sailing hard. The rear support wire will be somewhat slack when sailing into the wind, since the mainsail takes over the task of supporting the mast.
SECURE ALL COTTER PINS AND RINGS:
Make sure all the cotter pins and rings are in place and the cotter pins are opened and secured.
LOWERING THE MAST:
The mast is lowered by reversing the above process. Disconnect the forward support wire turnbuckle from the forward deck fitting, but leave all other wires connected. When the forward wire is disconnected, be very careful and not let the mast accidently fall to the rear. Also, watch out for overhead power lines that might contact the mast as it is lowered.
12. RAMP LAUNCHING
Make sure the water ballast valve is closed while the boat is being launched. The valve, when open, could hook on the trailer and cause damage. Remove the trailer lights and license plate. Attach a line to the nose of the boat. Back the trailer into the water until the boat floats free. Do not untie the nose of the boat from the trailer winch until the boat is in the water. On a reasonably steep ramp, the boat could slide off the trailer before it gets near the water. If you leave the car for any reason, make sure the brake is set, or the whole works may end up under water.
After the boat is launched, go inside and look to make sure there are no leaks. If you raise the mast after the boat is in the water, first fill the water ballast tank to give yourself a more stable platform.
13. THE WATER BALLAST SYSTEM
FILLING AND EMPTYING THE BALLAST TANK
WATER VALVE AND AIR VENT:
Just below the cabin access ladder, there is a small access door that contains the water tank valve and air vent. (Photo 28)
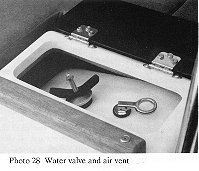
FILLING THE TANK:
To fill the tank, open the air vent by removing the lever plug (A). Then turn the wing nut (B) counterclockwise until it touches the cotter pin (C) at the upper end of the valve shaft. (Do not remove the cotter pin. If it is off the shaft, and if you turn the wing nut too far, the valve may fall out of the bottom of the boat.)
Push the valve downward as far as it will go. This moves a plate (D) and seal (E) away from the hull, allowing water to flow thru the water access holes (G) into the tank.
CHECKING THE LEVEL OF THE TANK:
When the tank is full, with the boat level, the water level is approximately 3" below the vent hole. It takes about 6 minutes to fill. Stick your finger in the vent hole. If you feel water, the tank is full. If you can't feel water, don't sail the boat.
WARNING:
The tank must be full before sailing the boat. Without a completely full tank, the boat will not be self-righting.
CLOSING THE WATER VALVE AND AIR VENT:
Reinstall the lever plug in the vent hole. Make sure it is tight, or the water ballast will spill into the boat when the boat leans over. There is an adjustment nut at the bottom of the lever plug. If the plug is too loose, hold the metal parts at the top and turn the rubber. The rubber portion of the plug will become fatter or skinnier as the rubber is rotated. Adjust it so that it must be forced into the hole. Then, when the lever is pressed to the horizontal position, it will really grip the hole and stay put.
To close the valve, turn the 3/8" wingnut (B) clockwise until it is tight. Get it as tight as you can with your fingers. It is not necessary to use tools. As you tighten the wingnut, the valve shaft (F), plate (D) and seal (E) are pulled up tight against the hull, sealing off the water access holes (G) and trapping the water in the ballast tank. As the wing nut is tightened, the cone shaped washer (H) and rubber seal (1) are pressed tight against the top of the water tank, sealing the top.
CHECK TO MAKE SURE THE VALVE AND VENT ARE SEALED:
If the 3/8" wingnut is loose, ballast water can come into the boat around the valve shaft, and it can leak out of the bottom of the hull if the boat leans over. If this happens, ballast is lost and the boat may no longer be self righting.
While you are sailing and the boat is tipped, check the valve and air vent to make sure there are no leaks. The more the boat leans over, the more pressure will be on the valve and vent, making a leak more likely. Watch them closely.
It is possible to test the water tightness of the lower part of the valve and its seal by pulling the boat out of the water with the tank full and valve closed. Check to see if it leaks. Do this frequently.Preferably every time you sail the boat
Avoid opening the valve or vent hole in choppy water or when the boat is leaning, because the water can surge around in the tank and spill out into the boat. This could flood the boat. The only time the valve and vent hole should be open is when you are emptying or filling the tank. Do not leave the valve and vent hole open and unattended.