If you leave the ballast tank full of water for long periods, drop in a few swimming pool chlorine tablets to prevent a bad case of algae. Be cautious when handling the chlorine tablets. Follow the directions on the chlorine tablet container very carefully. Don't put chlorine in the galley water tank.
15. RETURNING THE BOAT TO ITS TRAILER
Don't open the water ballast valve until the boat is on its trailer. If open, the valve can hook on the trailer as. the boat slides on. The result will be a damaged valve. The rudder and daggerboard should also be all the way up.
Before pulling the boat out of the water, winch the nose securely to the trailer to prevent the boat from sliding backward off of the trailer. Make sure the boat is centered on the trailer.
16. EMPTYING THE BALLAST TANK
Open the valve by turning the 3/8" wingnut (B) clock wise. remove the vent hole plug. Pull the boat slowly out of the water, and the water ballast will begin to drain out of the boat and back into the ocean. As the boat comes out of the water, the water level in the tank will be higher than the water level surrounding the boat. The water in the tank will try to seek the level of the surrounding water, and the tank will drain.
If the ramp is steep, and the valve and air vent are open, the nose of the boat may be higher than the holes in the top of the tank, and some water may spill into the boat from inside the tank. This can be remedied by pulling the boat out slowly, or by keeping the valve and air vent closed until the boat and trailer reach level ground at the top of the ramp.
If the ramp is steep or slippery, or if your car is feeble, it may not be able to pull the boat and the 1200 lbs of water up the ramp. If so, move forward just a small amount and wait for some water to drain. Then move forward some more, and let more water drain. Keep inching forward until the water is gone. In this manner, you will never have to pull out the entire 1200 lbs in one swoop.
Do not try to tow the boat with water in the tank. The trailer was not designed to carry the extra 1200 lb load.
Trailering with the water ballast in the tank will overload the trailer and probably your car.
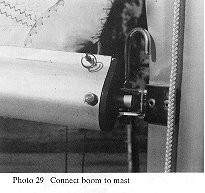
17. CONNECT THE BOOM TO THE MAST
The finished assembly is shown below. (Photo 29)
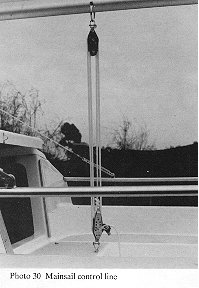
The 38' mainsail control line is installed as shown in Photo 30.
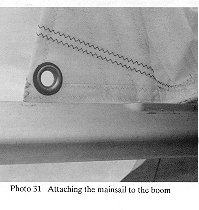
To hoist the mainsail, first slide the bottom of the sail into the boom as shown in Photo 31.
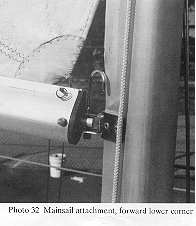
Pass the 1 1/2" pin through the boom and through the small ring in the forward lower corner of the sail (Photo 32)
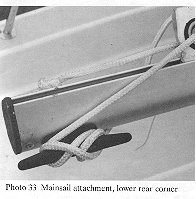
Run the rope at the rear end of the boom thru the sail and tie the line tight to the cleat at the end of the boom, as shown in Photo 33.
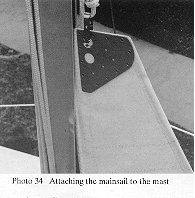
Connect the hoisting rope U shackle to the top of the sail, and feed the rope on the leading edge of the sail into the spread portion of the mast (Photo 34).
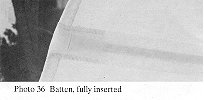
Insert the 3 fiberglass battens in the pockets in the rear edge of the sail as shown in Photos 35 and 36.

With the boat pointed directly into the wind, hoist the sail.
For light winds, the sail should be full and somewhat baggy along the boom. As the wind increases, the sail can be flattened for better efficiency by tightening the hoisting and boom end ropes. A common error is not having the hoisting rope tight enough. However, don't get it so tight that the sail has long vertical wrinkles along the mast.
19. FORWARD (JIB) SAIL
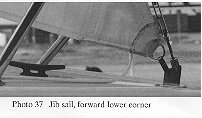
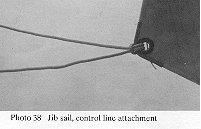
Attach the forward corner of the jib to the rear hole in the foredeck fitting, clip the jib to the forward mast support wire, and tie the jib control line as shown (Photos 37 and 38).
When the jib is raised, get the hoisting rope really tight. When sailing, there should be no scallops or sagging between the clips on the jib sail. A loose leading edge is the most common error and generally harmful to the boat's windward performance.
20. REDUCING THE AREA OF THE MAINSAIL (REEFING);
Don't hesitate to reef when it blows hard. The boat will be more manageable and usually faster. To reef, release the mainsail hoisting rope and lower the sail until the reefing eye on the front edge of the sail (about as high on the sail as the first batten) can be hooked into the hook that holds the boom to the mast. Then retighten the hoisting rope.
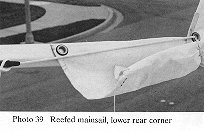
Release the rope that holds the rear end of the sail to the boom. Pass the line thru the reefing eye on the sail (near the bottom batten), around the boom, back thru the reefing eye, then to the cleat at the end of the boom (Photo 39).
21. RUDDER
MOUNTING THE RUDDER:
The rudder slips over the pins on the two fittings (pintles) bolted to the rear end of the boat. After the rudder is in place, insert a 1 1/2" cotter pin into the hole in the top pin, trapping the rudder on the pintles. Spread each side of the cotter pin at least 45 degrees to make sure that the rudder doesn't get loose from the pintles (Photo 40).

TRAILERING WITH THE RUDDER ON THE BOAT:
If you choose to keep the rudder on the boat while trailering, tie the tiller to the cockpit rails so the rudder won't swing from side to side.KICK UP RUDDER SYSTEM:
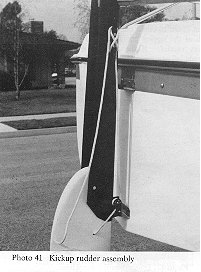
The kick up rudder blade can be secured, with the attached rope, in any position. When sailing, make sure that the blade is tied all the way down. If it angles back, the loads on the tiller will increase substantially. (Photo 41)
22. DAGGERBOARD
POSITIONS..
The daggerboard should be in the down position when sailing into the wind, to keep the boat from sliding sideways. It can he raised for sailing downwind in order to reduce drag. However, the boat steers a lot better when there is a foot or more of daggerboard in the water.
Make sure the board is fully up when putting the boat on its trailer.
CONTROL AND SAFETY ROPES:
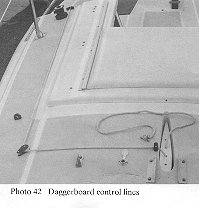
There are two lines connected to the daggerboard. The forward line raises and lowers the board. The second line is a preventer to keep the board from going too deep or falling out of the bottom of the boat. The lines are laid out as shown in Photo 42.
Tie the preventer line to the stainless steel eye on the deck so that the top of the board cannot go below the level of the water in the trunk. If it is allowed to go deeper, the sideways pressure on the board may damage the hull.
The daggerboard can be removed from the boat by lifting it up and out of the trunk. If the mast is raised and the sails are off the mast, you can remove the hinge pin and slide the base of the mast forward enough to allow the board to come out. With care, this can be done with all of the rigging connected and properly tensioned. Be very careful. If the mast base slides away, the mast could fall and cause chaos.
SHALLOW WATER SAILING
Be careful when sailing in shallow water. Keep the board up as far as possible to avoid damage. It is quite strong, and can take a pretty good whack, but why take the chance.
23. SECURING THE POP TOP
POP TOP LOCKS:
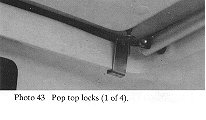
For trailering, securing the boat against theft, and for heavy weather, there are 4 locking devices to hold the pop top firmly to the deck. One of the locks is shown Photo 43.
SECURING HATCHES IN HEAVY WEATHER:
In windy conditions, make sure all 4 locks are screwed down tight, so no water can get into the boat if the boat leans over or gets buried in a wave. Also make sure that the foredeck hatch is clamped down tight. It is also a good idea to have the vertical cabin hatch in place when sailing gets rough. The last thing you need is a boat full of water. Periodically check the foam seals around the pop top and forward hatch. When the hatches are clamped tight, these hatches should be waterproof.
SECURING THE POP TOP IN THE RAISED POSITION:
Photo 44 shows the pop top in the up position. It is held up and against the mast by a lock that slides in the mast's sail feed track. Make sure that the thumb screw goes thru the hole in the front face of the pop top, and presses tight against the mast.
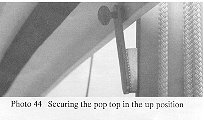
Make sure this lock is holding the pop top firmly, or a gust of wind or a lurch of the boat may drop the pop top on someone's head.
24. SAFETY RAILS
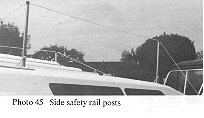
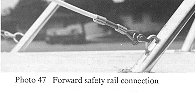
Make sure the safety rail posts and forward safety rails are secured with their set screws and cannot pull out. The set screws should be screwed in to where the heads are up against the socket. The lifelines connect as shown in Photos 45, 46 and 47.

25. SELF-RIGHTING CHARACTERISTICS
With sails rigged to the mast and boom, water ballast tank full, and the masthead pulled to the level of the water, the boat, when released, should return to an upright position. With virtually any sailboat, it is possible for the belly of the sails to trap enough water to hold the boat down on its side if the sail control lines are not released. In the event of a knockdown, release all control lines to prevent this possibility. In relatively calm sea conditions, water will not enter the cabin hatch in the event of a knockdown. In rough seas, however, it is possible for waves to enter the cabin through hatches if the boat is held on its side. While sailing in rough weather, it is advisable to keep all hatches closed and secured. Do not sail with the pop top up except in the lightest wind conditions.
26. FOAM FLOTATION
With the normal gear and crew, the MacGregor 26 has sufficient solid foam flotation blocks to keep the boat afloat in the event the cabin fills. When completely filled with water, the boat will be relatively unstable, and can roll over. Do not remove the foam flotation blocks from the interior of your boat under any circumstances.
?27. BOAT MAINTENANCE
LEAKS:
Even though the MacGregor 26 has no under water thru hull fittings, other than the water access system for the ballast tank, it is a good idea to check the cockpit, outboard well and galley drains to make sure all connections are tight and waterproof. Check the water ballast valve for leakage as described earlier.
WATER VALVE SEAL:
Check to make sure the rubber seal is bonded to the metal plate at the bottom end of the water intake valve. If the rubber comes loose, the incoming water could suck the rubber up against the hull and seal the water intake holes. It will then take forever for the tank to fill.
It is also a good idea to check the valve for signs of electrolysis or corrosion.
INSPECTING THE HULL AND DECK:
Periodically inspect the boat for cracks, delaminations', blisters or signs of impact damage. Gel coat, the outer cosmetic finish, is fairly brittle and occasionally cracks and crazes where it is stressed. This is normally cosmetic only. If crazing appears, check to see if the fiberglass itself, and not just the colored gel coat. is' damaged.
INSPECTING MAST SUPPORT WIRES:
The mast support wires should be checked frequently to make sure there are no broken strands. If you find a broken strand, replace the wire immediately.
INSPECTING HARDWARE:
Also check all bolted on hardware to make sure everything is tight and leak proof. Squirt the boat with a hose and look for leaks. If one is found, make sure the bolts are tight and all joints are sealed.
EXTERIOR FINISH:
The fiberglass finish should be protected in the same manner as an automobile finish. An occasional polishing and waxing (with any good quality automotive polish and wax) will keep the surface in excellent condition. If the boat is left in the water (either fresh or salt water), apply a good coat of anti-fouling bottom paint. Without good bottom paint, the white gel coat exterior surface may blister.
>
28. TRAILER MAINTENANCE
GENERAL:
A good periodic inspection and clean up can add years to the trailer's life.
All of the maintenance and operation procedures mentioned are very important as there are no warranties of any kind on brake systems for boat trailers.
BRAKE ADJUSTMENT:
To adjust the brakes, go through the following steps:
A. Jack up and support the trailer with the wheels mounted, brake drums cool, and the actuator in the towing position.
B. Compress the actuator mechanism several times to center the shoes in the brake drum, then return the actuator to the fully extended towing position.
C. On the inside or back side of the brake backing plate, you will find a rubber or spring steel plug. Under this plug there is a brake shoe adjusting slot. With a brake adjusting tool, similar to the kind used on cars, adjust the brake until a heavy drag can be felt when you turn the wheel and tire. Then back off the adjustment until the wheel just turns freely. Repeat the above steps on each brake drum. Adjust the brake linings after the first 1000 miles, and every 2000 miles thereafter. It is best to adjust them at the beginning of each season. Replace brake linings when they become worn.
BLEEDING THE BRAKE SYSTEM:
Fill the system with SAE 70 Ri or 70 R3 heavy duty brake fluid. Install a rubber hose on the wheel cylinder bleeder valve. Have the loose end of the hose submerged in a glass container of brake fluid to observe bubbling. By loosening the bleeder screw on the wheel cylinder one turn, the system is open to the atmosphere. Pump the actuator with long steady strokes. The bleeding operation is complete when the bubbling stops. Be sure to close the bleeder screw securely. Repeat the bleeding operation at each wheel cylinder. During the bleeding process, replenish the brake fluid, so the fluid level does not fall below 1/2 full in the master cylinder reservoir. After bleeding is completed, refill the master cylinder and securely install the filler cap. Replace cloudy, dirty or watery brake fluid.
AXLE MAINTENANCE:
At the front of the trailer, there is a red and white decal that explains how the axle and bearings are maintained. Buy a small grease gun and use a high quality multi-purpose non-fibrous grease, similar to the grease used in automobile wheel bearings. Put in enough grease to move the spring loaded piston about 1/8' outward from its seated position. Check the lubricant level in the hub by pressing the edge of the spring loaded piston. If you can move or rock the piston, the hub has sufficient grease. If it cannot be moved, add grease with the grease gun. Do not overfill.
TRAILER LIGHT CARE:
The lights are equipped with quick disconnect electrical plugs. All lights should be removed before backing the trailer into the water. Put a dab of petroleum jelly (Vaseline) on each of the quick disconnects. Be sure to disconnect the trailer harness from the trunk harness of the towing vehicle before backing the trailer into the water.
TRAILER PAINT MAINTENANCE:
To keep rust to a minimum, rinse the trailer with fresh water after every exposure to salt water.
GENERAL MAINTENANCE:
Frequently check the trailer to assure that all bolts and nuts are tight, that all welds look solid, and that there are no cracks or bends in the trailer structure. Inspect tires for cuts, bad bruises and worn tread. Replace tires as necessary.
29. **** LIMITED WARRANTY ****
MacGregor Yacht Corp. makes the following warranty to purchasers:
SAILBOATS AND SAILBOAT PARTS AND EQUIPMENT:
For a period of two years from the date of sale to the first use purchaser, MacGregor Yacht Corp. Will, through its selling dealers, repair or replace any sailboat part or sailboat equipment manufactured by MacGregor which is proven to MacGregor's satisfaction to be defective by reason of faulty workmanship or material.
TRAILERS AND TRAILER PARTS AND EQUIPMENT:
For a period of six months from the date of sale to the first use purchaser, MacGregor Yacht Corp. will, through its selling dealers, repair or replace any trailer part or trailer equipment manufactured by MacGregor which is proven to MacGregor's satisfaction to be defective by reason of faulty workmanship or material.
The above warranties will be in effect only if such part is promptly returned to the dealer with a sum sufficient to pay transportation charges to the MacGregor plant.
This warranty shall not apply to:
(2) All items installed by the dealer or anyone else other than MacGregor.
(3) Any failure resulting from lack of maintenance, normal wear and tear, negligent operations or maintenance. Negligent operation includes, but is not limited to, failure to properly and completely fill the water ballast tank when sailing, failure to empty the water ballast tank before trailering, failure to heed adverse weather warnings, and failure to use care when operating the boat near sources of electrical power.
(4) All accessories or equipment not manufactured by MacGregor. Any warranty furnished by the manufacturer, if possible, will be passed on to the boat owner.
(5) Trailer brake systems and trailer lighting systems.
(6) Exterior paint and gel coat finishes. Although we use the finest finishes available in the industry, they cannot be warranted because they are affected by climate and use conditions beyond the control of MacGregor Yacht Corp.
(7) Any other person than the first use purchaser of the boat.
(8) Any boat or part manufactured by MacGregor which shall have been altered in any way so as to impair its original characteristics.
The purchaser should understand that the dealer is not an agent of MacGregor Yacht Corp. and MacGregor does not authorize the dealer or any other person to assume for MacGregor Yacht Corp. any liability in connection with such warranty or any liability or expense incurred in the replacement or repair of its products other than those expressly authorized herein.
MacGregor reserves the right to improve its products through changes in design or material without being obligated to incorporate such changes in products of prior manufacture.
DEALER'S RESPONSIBILITY
It is further the responsibility of the dealer to furnish guidance and information to the purchaser on matters pertaining to service and maintenance during the warranty period, and in addition to process any claims under the warranty to MacGregor Yacht Corp. The dealer is responsible for making sure that the owner receives the Owner's Instructions and understands all information contained therein.
OWNER'S RESPONSIBILITY
Purchasers are to take the following steps in pursuing a warranty claim.
(2) The Owner's Instructions, as well as instructions furnished with any accessories installed on the boat, shall be placed in a large envelope and remain aboard the boat. Purchasers should make special effort to make sure that this literature is delivered to them by the dealer or MacGregor Yacht Corporation. Careful attention to these instructions will add many years to the life of the boat and equipment
(3) It is understood that all matters of service are handled with the selling dealer. Purchaser should notify his selling dealer regarding any problems under the warranty.
(4) The dealer shall be given an opportunity to supply parts needed for all repairs for which a claim is to be made
(5) The purchaser agrees to use the boat in a reasonable and safe manner. It is necessary for the owner or operator to use extreme caution when operating the boat in severe weather, when operating the boat, trailering, or raising and lowering the mast near power lines or sources of electrical power (contact between a power line and the mast or rigging could cause injury or death), and when preparing the boat for trailering.
(6) The purchaser must use care to assure that the boat is not sailed unless the ballast tank is completely full and the valve is closed and sealed.
(7) The purchaser must familiarize himself with all information contained in the Owner's Instructions, particularly the warnings contained in pages 1 and 2